Monday, October 18, 2010

Tips for shooting at night

Montreal coloured cityscape

You can walk by the same spot 10 times during the day and not find anything interesting. But once the sun sets (or is just setting) and the lights of the city turn on, the same scene you walk by during the day turns into something magical. It could be the mix of colours due to different light sources (ie - white balance), the stillness and serenity of the image caused by long exposures, I don't know. Just something about it that I love.

So I decided to make a quick write up about what goes on through my mind when I'm doing a night shot.


SETTINGS AND TOOLS

- Low ISO is a must for me. Sure, you can take a higher ISO shot at night and will give good results, specially with how some camera's handle high ISO, but generally, I aim for ISO 100 on my Canon 7D. Yes, my camera handles high ISO well, but the low ISO allows me to get longer shutter speeds which are essential in night shots

- Small apertures. I'm usually in the f/11 - f/16 range. The smaller your aperture, the deeper your depth of field will be - ie, the more you will have in focus. This applies to landscape photography done during the day as much as night shots. A great side effect of small apertures is a start effect in some lights, which adds some coolness to the shot.

- Slow shutter speeds. If you shoot in AV, the combination of low light, small aperture and low ISO will mean a long shutter speed, often in the realm of 15 seconds. A long shutter speed is great for capturing fun car light streaks when you are shooting streets. It also allows for people to walk through the frame and not be captures, enhancing the serenity of an image as it can be a busy street that appears empty.

- I like wider lenses for city spaces. I often use my Canon 10-22 on a crop body, settling in around 16mm. That would be around 26mm on a full frame. I will sometimes use a longer focal length, but I always have my wide angle with me

- A tripod is a must. I don't know anyone who can hand hold a camera for 15 seconds without shaking.

- To go with the tripod, you should have a remote release. Any movement can cause slight shake which will affect the image. Even the movement of hitting the shutter button. If you don't have a remote, then look into how to use the delay timer in your camera. I'll set mine to 2 second delay so the camera has time to settle after I hit the shutter

Opera house at night


COMPOSITION

There are many composition rules that can be applied, and many more that can be broken. I'm not going to start listing the basics of photography such as rule of thirds, leading lines, triangles and so on, you can do some googling on that (or maybe I'll blog separately about it at a different time). What to look for when shooting at night?

REFLECTIONS
Finding a nice body of water to use as a reflection for either an entire cityscape or something as simple as a street lamp can add that fun element in the image. If you are doing a cityscape with a body of water, I find that reflections look nice when your horizon line is in the middle of your frame, allowing for the reflection to be almost as equal as the cityscape itself.

Another thing to think about with reflections in water is the weather. If you have a windy day, you will have ripples in the water that will distort the image but still show the light when shooting at longer shutter speeds.

See the below and how it compares to the intro image. Same place, different times of the year, different weather conditions. The one below had no wind, the one up top and more.

MontrealCityScape-30w

CAR LIGHT STREAKS
I mentioned it in the tools and settings. Long exposure means that cars will be passing through your frame. The head lights and tail lights being bright will register on your sensor while the rest of the car will not. Look for roads that twist and turn or use a bit of camera tilt to create a diagonal line in the streaks. This will add a sense of motion to the image.

Light streaks

Play with the shutter speed to get different streak effects. See what a 30 second exposure will give you vs. a 5 second exposure. If you are shooting a less travelled area, think about using Bulb mode. Let’s say your settings say that your shutter should be open for 25 seconds. But there aren't many cars going by. Set your camera in bulb mode and have something black to cover the front of the lens like a piece of cardboard. Start the picture with the front of the lens covered. When a car goes by, remove the cardboard and count how many seconds your shutter is open with no cardboard in front. Let’s say it took 3 seconds. Once the car is out of frame, put the cardboard back. Wait for more cars to come by and count again until you hit 25 seconds.

ZOOM PANS

A zoom pan is a simple process. And it only works if you have a zoom lens. You can always attempt if with a prime lens, but you need to be able to walk very very quietly (that’s my Elmer Fudd online typing imitation). I prefer zoom pans at night, but they also work during the day. You start your image at either end of your focal range. So let’s say you are shooting with a 10-22mm. You start at 10mm. You need to try and time the shot so that while the exposure is being taken, you are able to zoom to 22mm. When you hit the 22mm, your shutter closes.

bonesecourszoom

Oratoire St-Joseph

That the basic idea, but if you hold the zoom in certain places for longer periods, it will give you different effects. Same if you zoom pan from 15mm to 22mm instead of 10mm to 22mm. Photography is about trying things out and learning as you go.

LONG EXPOSURE NOISE REDUCTION
Most modern cameras have this as a setting. You can turn it on or off in your custom menu area, check your instruction manual.

What does it do? Well, just as it says. For long exposures, it will reduce the noise. How does it work? Well, when your camera is done taking your image, it takes a second image without opening the shutter (called a dark frame). It then uses the dark image and compares it to your image and substracts the noise.

Is it perfect? No. But it does a good job. Should you use it over noise reduction in post processing? You be the judge. As I use low ISO which causes little noise, I find that using in camera noise reduction for long exposures does a great job and I dont need to process the image for noise reduction later.

It comes down to my philosophy of getting your image right in camera first...which means exposure, crop and noise control.


There you have it, a few tips and ideas for night shots. Nothing said anywhere in photography is gospel. So take the words for what they are worth, tips and ideas. If you want to try an ultra high ISO night shot, go for it! See what it gives and how you can work with that.

If you have questions, shoot me an email or post up a comment.

Thanks for reading!

Thursday, October 14, 2010

Halloween costumes for photographers

Not sure if you are like me, but I like to bring my camera everywhere I go. On Halloween, there will be so many photo ops when your friends, family and total strangers that are all dressed up.

So when thinking up what I'm going to dress up as, I like to try and incorporate my camera. Here are a few ideas I've had, feel free to comment and add more!!

1- 1930s Press Guy
What do you need? Trench coat, hat, card that says PRESS to stick in the hat. That's pretty much it. If you want to fancy up the costume, you can have a flash on a cord or even with a radio trigger. Take it one step further have bring your tripod, leave your camera on it and put a black sheet over yourself when taking an image.

Great way to get shots of strangers...

2- Death on vacation
I did this one a few years ago. What do you need? A death robe, Hawaiian shirt, sandals and white socks. As Halloween is the day for the dead people to come out, my shtick was that Death is taking the day off tonight and is on vacation. My camera hung around my neck, I'm a true tourist

3- Death on safari
A take on the Death on vacation, but with a photo vest, safari hat and some boots. You get the idea

4- Paparazzi
A little harder to explain to people, but if you dress in all black, stay away from people and then jump out and shoot in burst mode with the flash going off, you might pull off paparazzi. You can maybe throw in a copy of the National Enquirer in your back pocket and use some makeup for a black eye to show your "battle scar" from your last shot.

5- Flasher
Think trench coat. Wear shorts and a tank top so your legs and bare chest show. Make some sort of harness that can support your camera with a flash attached. Pre focus the lens for 5 feet in front of you and switch it to manual focus. Set the shutter to be triggered by remote, putting the remote in your sleeve. When you go and "flash" someone, open the trench coat, hit the remote and BANG! they are flashed and you get a cool picture. Makes for a nice montage at the end of the night.

That's what I've come up with. Some original, some not really.

Happy Halloween!!!

:)

Tuesday, October 5, 2010

La Ronde rides

My wife and I had season passes for La Ronde, the Six Flags park here in Montreal. We went as many times as we could go and I brought along my XSI (wasn't brave enough to drag the 7D)

We were there mostly for fun, and I had all intentions to head back one day and one night just for photography, but never got around to it.

I was going through my Lightroom and realized I never did anything with any of those images, so here are a few quick edits of the Goliath, the tallest coaster in Canada when it was built (now second tallest).

Hope you enjoy!

OMG!!! Here we GooooOOooOOoo. The front is really fun on this one
LaRonde2010-1

Putting a little motion in the image
LaRonde2010-2

This is taken from the back parking lot
LaRonde2010-3

A couple more stylized shots of the park
LaRonde2010-4_Orbit

LaRonde-5_Splash

Monday, October 4, 2010

Black Rapid RS-5 camera strap

Images are provided by Black Rapid (www.blackrapid.com)

Some would think that a camera strap isn't too important. The manufacturer includes one with the camera and that should be good enough, right? And for some people, it is. When I started using a Canon 7D with a grip and had a 70-200 f/2.8 IS mounted when shooting multi hour events or walking the streets for hours on end, I would start to get neck and back pain. So I started looking into getting a new camera strap.

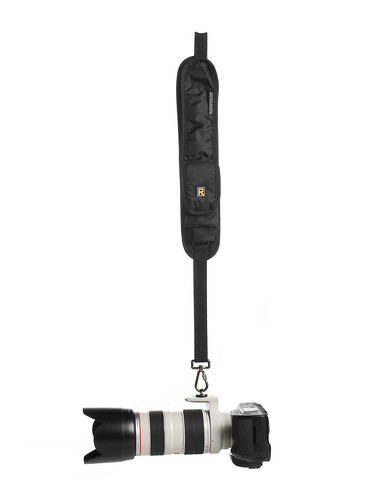
Thats when I came upon Black Rapid straps. They don't go around your neck, you wear them slung accross your chest with the camera hanging near your waist. When you need to shoot, the camera is near your hand, so its one quick motion to bring it up to your eye. Looked cool, alot of people like them. I was hesistant, as they range in prices from $40 to over $120.

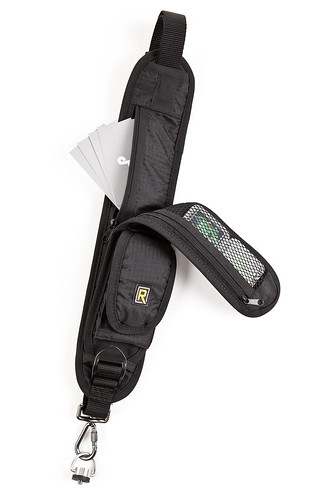
Friend of mine was heading to our fave camera store at lunch time one day to buy a grip and battery for his D700. I tagged along and actually came out of the store with a new Black Rapid RS-5 strap. Its the one that has the flap that comes down to store memory cards, cell phone, battery, credit cards,... They didnt have the standard RS-4 in stock, just the RS-5, RS-7, Doubler and the RS-W1 for woman.

Here is an image of the flap compartment from the RS-5. This part of the strap goes over your shoulder:
RS-5-4

I got home and tried it on, adjusted it (took me a while to find the right lenght and such) and I was not convinced. It just seemed awkward having this cross body strap to carry around my camera. I attached my 70-200. It held fine, but I was still thinking of this odd setup was worth $80.

I was going out with Reneau (same friend who I went to the camera shop with) to shoot some power / speed boat races that Sunday. Nothing too complicated, one of the sponsors wanted shots of the boat that had his name on it, and everywhere else there was a sign with his name. No prob. He got us VIP access (so we were at the water's edge) and also pit access.

--Side bar--it was the first time I ever had to sign a death waiver for a photoshoot. The pits are like organized chaos with teams putting their boats in the water and some taking them out with the help of 4 cranes. The boats would be going over your head...check out the shots a few blog posts below.

All that to say that I used the RS-5 for race day. I figured that if I didn't like it, I'd bring it back. I had with me my Lowepro Classified (shoulder bag) that I usually have, slung accross one side of my chest and the RS-5 going the other way. The bag had my 10-22 and 28-75 while my 70-200 was on the camera. I also had a monopod. We worked from 11am to about 5pm.

And here an image with a 70-200 attached. Notice how it handgs upside down
IMG_1014

I got home, I had no neck pain, no backpain. The strap was comfortable, the swing motion to bring the camera up was easy to get used to. I was hesitant at first of having the camera hang there, but towards the end of the day, I was just letting it drop to the side. Once you find that sweet spot for the lenght of the strap, no more adjusting is needed. My strap goes a bit lower than what most people do as I had issues with holding the camera in portrait mode when the strap was shorter.

The other issue I had was with the tripod quick release plate. See, the Black Rapid strap screws into the tripod socket of your camera or your grip. But when using a monopod, I need to screw the mounting plate in that same hole. While the mounting plate has a D ring to fasten the it to the camera, no way am I connecting the R-strap to that D ring as I'm 99% sure its not a solid piece of metal and would not hold the weight of the 7D, grip and 70-200 for very long. I however saw a press release from Black Rapid on September 13th about a new FastenR-T1 Tripod Solution. Looks like a solution is around the corner. Seems that it will replace the D ring that comes with the mounting plate with a Black Rapid super solid D ring

To get around that, I had the RS-5 connected to the camera and I kept the mounting plate on the mount of my 70-200. When I used the monopod, I'd just quickly release the carabiner at the end of the strap, attached the monopod to the quick release that is on the lens, and voila!

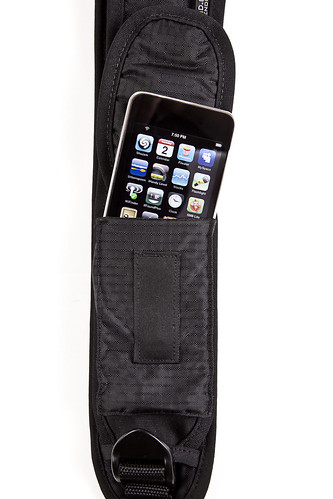
I ran out of memory and was happy to have quick access to the cards in the strap flap. I found out that when your cell phone rings, it will be loud as its really close to your ear. I took note to adjust the volume nex time.

While I dont have an iPhone, it apparently does fit in the cell phone pouch, but nice and tight, not much room to spare.
RS-5-3

Overall, I'm happy with the strap, its staying for sure. And turns out Reneau picked up a Black Rapid as well. I'll try and get some images of me wearing it up soon :)

Thursday, September 30, 2010

My Froknowsphoto chat

A few weeks ago, when I was doing online research on Black Rapid straps, I stumbled on Jared Polin's site froknowsphoto. He had a fun twist on typical reviews, adding a bit of humour, which was interesting to say the least.

I joined his site, ended up following him on twitter and his flickr group. No, I'm not a stalker, I swear.

I posted a recent image I took to his group as I like to randomly do to flickr groups and he messaged me saying he wanted to use my image as his Picture of the Week and have a quick interview on Skype.

Cool! Having anyone take interest in your images is great, specially when that someone knows their stuff. Jared is a great photographer. I particularly like his concert and back stage shots.

So after a few days of back and forths, we finally managed to meet up on Skype. What happens when you get two guys who like to talk together talking about what they like? About 40 minutes (and it could of been more). Started with a 5 minute "hey, how are you", moved into him being disappointed I didn't have a french accent (and can't do one), then the 15 minute interview (with no prep, which is fun), then another 20 minutes chatting about photos, marketing, online, lenses and going into health care, politics, canadians, palestine and other stuff.

Here is a link to the interview and to the image

Fro's POTW - Montreal

And here is a link to Jared's personal site, if you want to check out his work