Hi there, hey there.
If you have found this site, please note that I am no longer keep this blog up to date. I have worked out a new website that has a blog integrated and have moved there permanently and will not be updating this blog.
Just head to my new website at PierreBPhoto
Or you can always follow my Facebook Photo page
Or even follow me on Twitter
Or all of the above!
Thanks! :)
Thursday, November 22, 2012

Sunday, March 25, 2012
5D Mark III in the pit
Wow, has it really been since January since I've had a new blog entry? Damn its been a busy last few months.
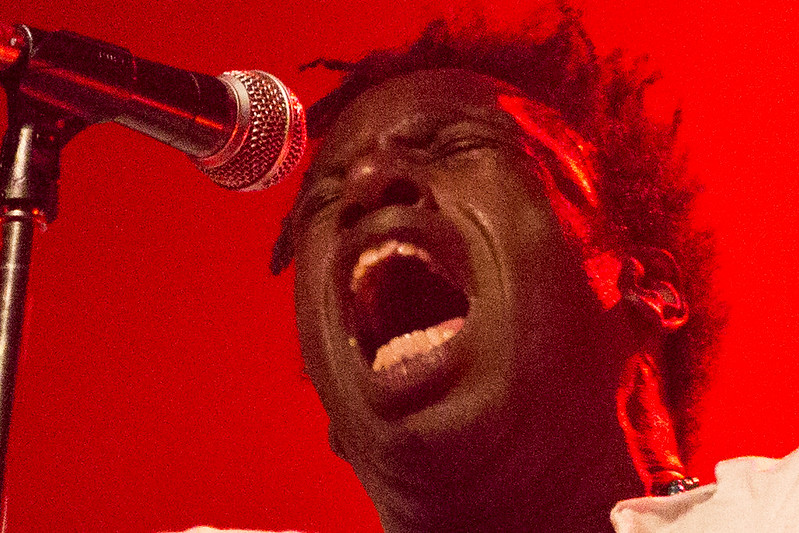
I'll let most of the images speak for themselves. As of today, I cannot open the 5D Mark III raws in Adobe Lightroom 4. So I am stuck using CS5, which I am really not used to. There have been some slight tonal adjustments in all these images, but there has been no noise reduction. So keep in mind that with today's noise processing, you can net some awesome images. I'm not going to bother posting up some ISO 1600, 3200 or even 6400 as these are what you would expect.
Saul Williams
ISO 12,800
f/2.8
1/100

And a 100% (or just about) crop of the above.
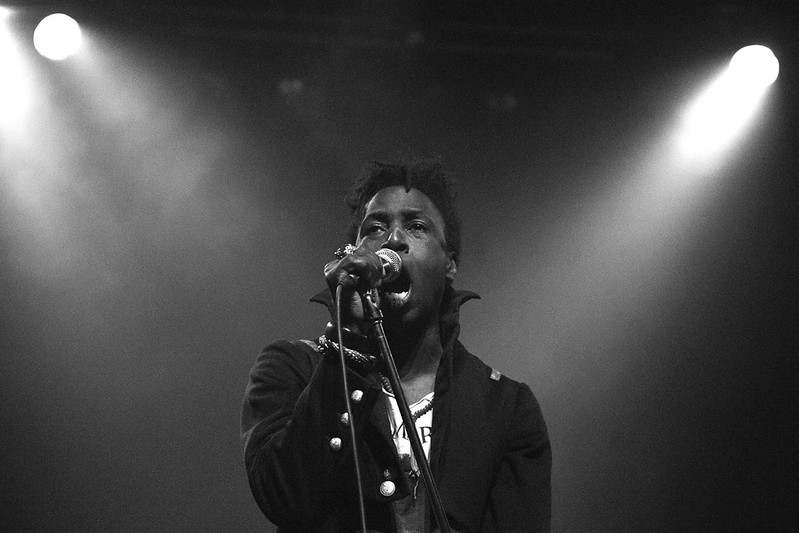
I do like to sometimes throw in a black and white image in a set. So here is a black and white of Saul.
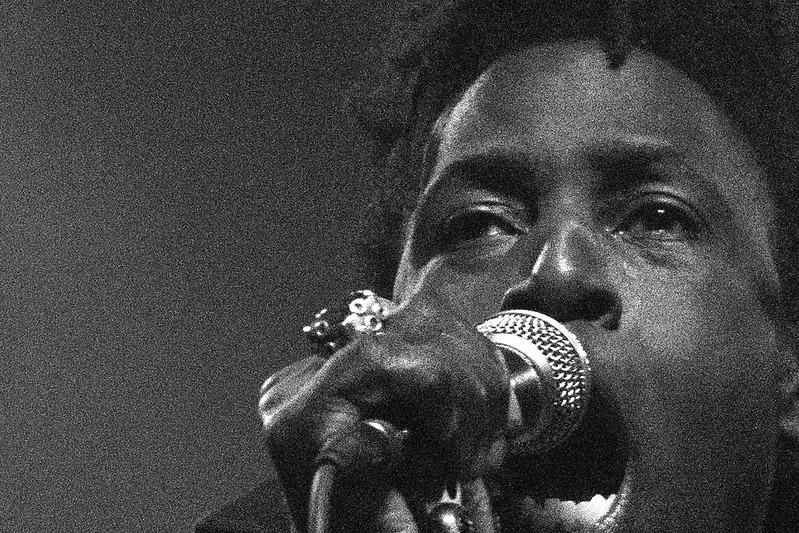
ISO 12,800
f/2.8
1/200
And....the 100% crop
I picked up a new camera body last week. The just released Canon 5D Mark III. This is the camera I wanted when I picked up the Mark II last year. I've been waiting for it. And out of character, I bought it on day 1.
I did some basic tests at home to get used to it, played with some settings and all that. But the real test was using it in a show, which I had the chance to do last night. I was covering the Saul Williams show for www.sorstu.ca . Just a quick note about the artist. Hip hop isn't my thing. Really. But this guy was insane. It was great to see someone with such originality on stage. He is a poet and had some spoken word between his songs, and his songs were very original. Too many artists today, in all genres of music, do pretty much the same thing. Hats off to Saul Williams for his original and great work.
**there was no actual photo pit last night, just made the title of the post seem cooler using the word pit**
Now....onto the camera.
Show time essentials
I used the camera with the 24-70 for the show. I had the 70-200 on the Mark II. The venue was La Tulipe, which is an alright venue but the light can go from decent to crap really fast. And most nights, its in the crap zone. I set both cameras to ISO 3200, f/2.8 and 1/160 to start the show.
The two main things I was looking for in this camera is a much improved AF (Auto focus) system and better high ISO noise handling. The 100% viewfinder, more comfortable ergonomics, better LCD and all that are just icing on the cake. So lets get into the cake.
The two main things I was looking for in this camera is a much improved AF (Auto focus) system and better high ISO noise handling. The 100% viewfinder, more comfortable ergonomics, better LCD and all that are just icing on the cake. So lets get into the cake.
High ISO
Keep in mind that my intended output is the web, not a 24x36 print, so I dont mind noise in my image. But there is always an acceptable level of noise. I spent most of my night in the ISO 12,800 area. A few at 25,600 to see and a few at 6400 just in case. I was very happy with the ISO 12,800 noise. I was actually impressed with the ISO 25,600 noise. I can extend the ISO to 102,000, but I find the extended ISOs are only a marketing thing for the manufacturers, as the results are usually pretty bad.
I'll let most of the images speak for themselves. As of today, I cannot open the 5D Mark III raws in Adobe Lightroom 4. So I am stuck using CS5, which I am really not used to. There have been some slight tonal adjustments in all these images, but there has been no noise reduction. So keep in mind that with today's noise processing, you can net some awesome images. I'm not going to bother posting up some ISO 1600, 3200 or even 6400 as these are what you would expect.
Saul Williams
ISO 12,800
f/2.8
1/100
And a 100% (or just about) crop of the above.
I do like to sometimes throw in a black and white image in a set. So here is a black and white of Saul.
ISO 12,800
f/2.8
1/200
And....the 100% crop
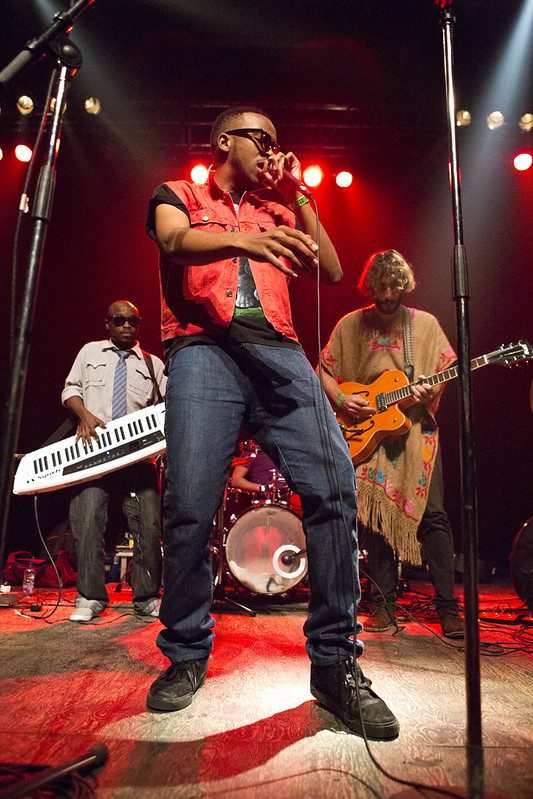
Opening the show last night was Spoek Mathambo. Here is the higher ISO shot from his set
ISO 25,600
f/3.2
1/1000 (yes, I know I didn't need to be there, it was a test ;) )
And the really close up crop
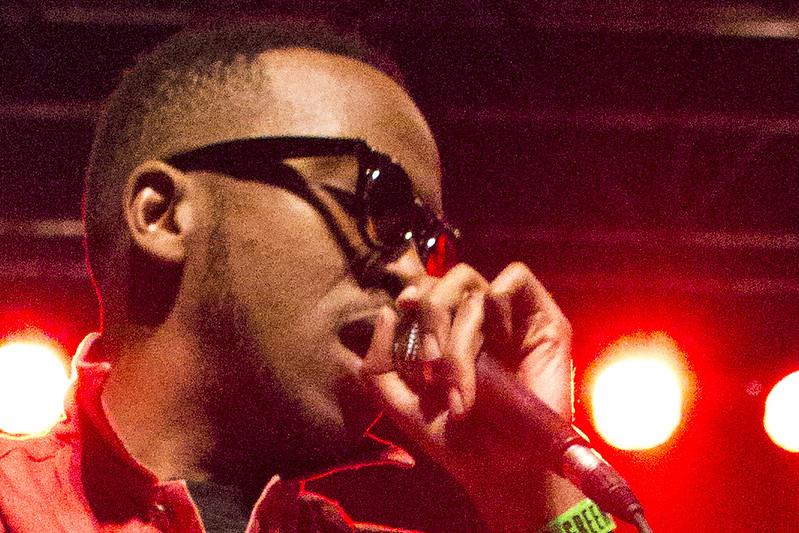
I still need to learn to shoot more comfortably with the camera. Shooting high ISO is not just turning the ISO up and then shooting. You have to look for the better light, understand how your camera will react, nail your exposures (or get them how you want for the settings you have and the processing you intent).
Auto focus
ISO 25,600
f/3.2
1/1000 (yes, I know I didn't need to be there, it was a test ;) )
And the really close up crop
I still need to learn to shoot more comfortably with the camera. Shooting high ISO is not just turning the ISO up and then shooting. You have to look for the better light, understand how your camera will react, nail your exposures (or get them how you want for the settings you have and the processing you intent).
Auto focus
This was the second major piece in the new camera that I was excited about. The 5D Mark II was known to have issues with the auto focus. It was slow, it missed often. While Canon did come out with some firmware updates throughout the years that helped, it always seem to be lacking.
Canon recently announced their 1Dx line, which is the cream of the crop, and I was happy to hear that the AF had been totally redone AND that they were porting the new AF in the 1Dx line into the 5D Mark III line.
Not to get too much into the tech, there are 61 auto focus points in the camera. While the 5D Mark II only had 9, of which only the center one was sensitive. So similar to shooting with the 7D, you don't have to always center, half press, recompose. You can move the focus point around and it will react just as quick and efficiently as if you were using the center point.
I had no issues with focusing during the dimly light show. I missed a few due to the artist moving too quickly, but generally, when I wanted to switch focus to something else, the camera reacted quickly and was spot on.
You have the benefit of selecting multiple focus point groupings and all that funky stuff, but really, when you strip it down to the essentials, the new AF works pretty damn well.
A few things I need to get used to
Canon recently announced their 1Dx line, which is the cream of the crop, and I was happy to hear that the AF had been totally redone AND that they were porting the new AF in the 1Dx line into the 5D Mark III line.
Not to get too much into the tech, there are 61 auto focus points in the camera. While the 5D Mark II only had 9, of which only the center one was sensitive. So similar to shooting with the 7D, you don't have to always center, half press, recompose. You can move the focus point around and it will react just as quick and efficiently as if you were using the center point.
I had no issues with focusing during the dimly light show. I missed a few due to the artist moving too quickly, but generally, when I wanted to switch focus to something else, the camera reacted quickly and was spot on.
You have the benefit of selecting multiple focus point groupings and all that funky stuff, but really, when you strip it down to the essentials, the new AF works pretty damn well.
A few things I need to get used to
The new button layout. My brain is a simple one. When I learn one way of doing things, takes me a while to unlearn. They moved some buttons around so its not as intuitive for me...yet.
The mode selection lock. They added a button you have to push down to change the mode. While I see where this can work, and I've had situations where putting the camera in my bag turned the wheel, I need to remember the lock and not force the mode change.
The mode selection lock. They added a button you have to push down to change the mode. While I see where this can work, and I've had situations where putting the camera in my bag turned the wheel, I need to remember the lock and not force the mode change.
Switching from the 5D2 to the 5D3. I use both cameras in a show and by the end of the show last night, I didnt want to use the 5D2 anymore. I know, #firstworldproblems , right?
Cool feature I just found (as in right now, as I was typing this)
Cool feature I just found (as in right now, as I was typing this)
Silent shooting. Yep, you can set it to S as a shooting mode (single shot or continuous) and while your camera's fps will slow down, you dont have the always noticable clunk clunk of the mirror going up. You still hear something, but much more silent. Going to make those stealthy ninja pictures that much easier.
There is still so much more to explore in the camera. Being able to do set the number of bracket shots, multiple exposures in one frame (which Nikon has been doing for years), in camera HDR (gadgetty, I know, but still going to try it out).
While the price tag was heavy, the camera is living up to my expectations...so far.
While the price tag was heavy, the camera is living up to my expectations...so far.
Saturday, January 14, 2012
Lightroom 4 beta - highlights and all that jazz
I'm having too much fun with the new Lightroom 4 beta. If you want the basic intro bla bla bla to what I am doing, look at my prior post on Clarity. I'm too lazy to repeat myself.
The next major component that I live off of in photo editing is the tones (I think that's what it is called). This is where you set the contrast, exposure and other fun things.
Lightroom 3 had a series of adjustment sliders that were practical, but if pushed too far, made the image look a wee bit crappy. Exposure, recovery, fill, black, brightness, contrast. These have been redesigned for Lightroom 4 and are now exposure, contrast, highlights, shadows, whites and blacks.
Playing around with them, they seem to do a similar job, however, they allow you greater control over the tone details. Here is an example of some tweaking I did, again, using my "push the slider to the max" uber testing method.
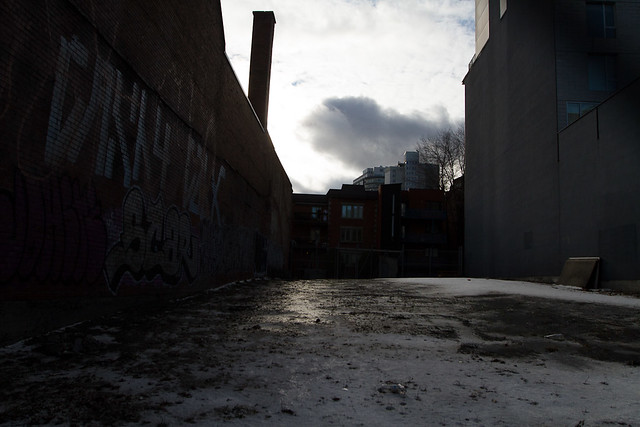
This is the straight out of camera image. I know, I know. It is pretty damn dark. Well, this image was part of a 5 shot HDR (where you merge variously exposed images into 1). This was purposely done at a -2 exposure level. But I thought it would be a great candidate to test out how Lightroom 4 will work at filling in shadows and dark spots, without killing the image quality.

Well, I think the image speaks for itself! From that dark image, I maxed out the highlights, shadows and whites and I ended up with a pretty decent image which retained a good amount of detail.
*a little note here that I always shoot in RAW, rarely in JPG. The reason is that the RAW file will contain ALOT more data than the JPG, which compresses the data into a smaller file size. A typical RAW would be around 21 mb while the equivalent JPG would be about 12 mb, or half the size. So this type of adjustment may not be possible with a JPG.*
With many of my urban shoots, I love to add some clarity. After my last tests with the new clarity slider, I decided to also use it on this one (and once again, maaaaxed out). Here is what my adjustment sliders looked like for this final test image.
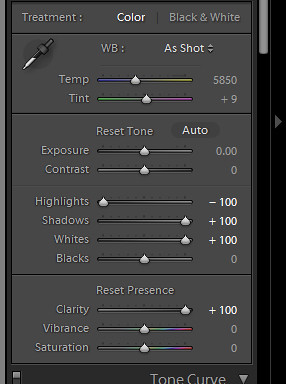
Yep... maxed out.
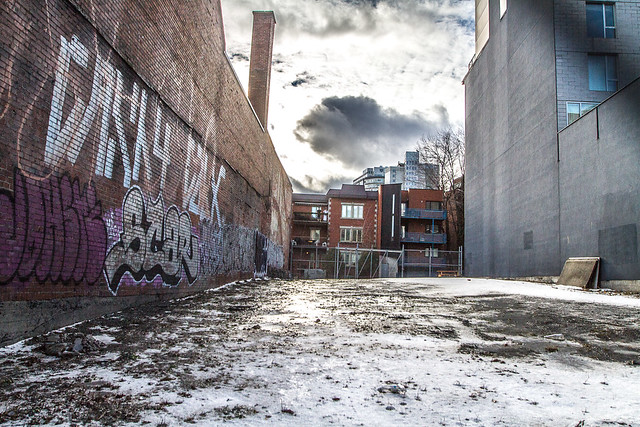
Ok, now this is getting inter-resting! From LR4 sliders only, I'm getting an HDR feel to this image. A bit surrealist / exaggerated, but still not totally over the top!
And for a point of reference, here is similar processing of the same under exposed image done in Lightroom 3 (recovery, fill, clarity all maxed). Similar effect, but not as punchy. Look at the clouds in the two images or even the level of "grit" on the floor.

The whole point of posting these maxed out adjustments is not to show how crazy you can make an image, but to visually explain that while you can push things to a much funkier max, you now have alot more flexibility in the in between levels.
Not sure how much more time I'll have with the software, I'm hoping to push through some portrait adjustments and try out the new brushes.
The next major component that I live off of in photo editing is the tones (I think that's what it is called). This is where you set the contrast, exposure and other fun things.
Lightroom 3 had a series of adjustment sliders that were practical, but if pushed too far, made the image look a wee bit crappy. Exposure, recovery, fill, black, brightness, contrast. These have been redesigned for Lightroom 4 and are now exposure, contrast, highlights, shadows, whites and blacks.
Playing around with them, they seem to do a similar job, however, they allow you greater control over the tone details. Here is an example of some tweaking I did, again, using my "push the slider to the max" uber testing method.
This is the straight out of camera image. I know, I know. It is pretty damn dark. Well, this image was part of a 5 shot HDR (where you merge variously exposed images into 1). This was purposely done at a -2 exposure level. But I thought it would be a great candidate to test out how Lightroom 4 will work at filling in shadows and dark spots, without killing the image quality.
Well, I think the image speaks for itself! From that dark image, I maxed out the highlights, shadows and whites and I ended up with a pretty decent image which retained a good amount of detail.
*a little note here that I always shoot in RAW, rarely in JPG. The reason is that the RAW file will contain ALOT more data than the JPG, which compresses the data into a smaller file size. A typical RAW would be around 21 mb while the equivalent JPG would be about 12 mb, or half the size. So this type of adjustment may not be possible with a JPG.*
With many of my urban shoots, I love to add some clarity. After my last tests with the new clarity slider, I decided to also use it on this one (and once again, maaaaxed out). Here is what my adjustment sliders looked like for this final test image.
Yep... maxed out.
Ok, now this is getting inter-resting! From LR4 sliders only, I'm getting an HDR feel to this image. A bit surrealist / exaggerated, but still not totally over the top!
And for a point of reference, here is similar processing of the same under exposed image done in Lightroom 3 (recovery, fill, clarity all maxed). Similar effect, but not as punchy. Look at the clouds in the two images or even the level of "grit" on the floor.
The whole point of posting these maxed out adjustments is not to show how crazy you can make an image, but to visually explain that while you can push things to a much funkier max, you now have alot more flexibility in the in between levels.
Not sure how much more time I'll have with the software, I'm hoping to push through some portrait adjustments and try out the new brushes.
Friday, January 13, 2012
Lightroom 4 beta testing - Clarity
My choice software for editing is Adobe's Lightroom 3. Why LR? It is fast. The workflow I have with the software gets me through an entire set of show images, selected, edited, exported, watermarked, usually in under an hour. It's a godsend for me.
So when a friend sent me a link to the Lightroom 4 beta download, I decided to give it a try. It's always fun to see what the software companies are doing. The beta comes with a bunch of warnings about how it can be buggy, crash and so on, so it is always a risk installing something like this. But no worries, they don't allow you to update your Lightroom 3 image catalog, so your existing images and edits and safe.
There are a good number of changes to the software that I won't really try out as they don't interest me and I don't currently use them. Such as a new map that shows the location of your images and a Book module that seems to be linked to Blurb (actually, looks cool).
I'm really curious about the changes to the image processing. In my image processing, I'm usually tweaking exposure, contrast, clarity, fill / recovery light, highlights/shadows, white balance, saturation and then noise and sharpening if needed.
Note that my testing is usually pretty simplistic. I'll stick with one adjustment slider, crank it to the max and then the min. I'll compare with the same thing in Lightroom 3. I'll throw in some various sliders, try and do the same thing I normally do in Lightroom 3 and compare the end results.
So my first stop is the Clarity slider. I love Clarity in Lightroom 3 for urban shots. I find it's great around 50-70% where there are lines and detail in the image. I use it sparingly for people shots, maybe 5-10% as I don't like the effect too much. It tends to bring out wrinkles in the face and give the subject a very harsh look, without adding much interest to the image.
For this test, I took an image of Tim Lambesis, lead singer of As I Lay Dying from the Heavy MTL festival. A rare moment where he isn't jumping around. This first image is straight out of the camera, no edits other than whatever default Lightroom 4 has in there (which is typically just sharpening for export).

Slightly under exposed, but a decent image to try out the Clarity slider. The light is a bit flat so the clarity shouldn't hurt the facial details too much, but I really like the murky background. This would be an image I pump a little more Clarity into.
So in Lightroom 4, all I did was max the Clarity to 100% and this is what I get. Take note of the changes in the hair and also in the tattoos.
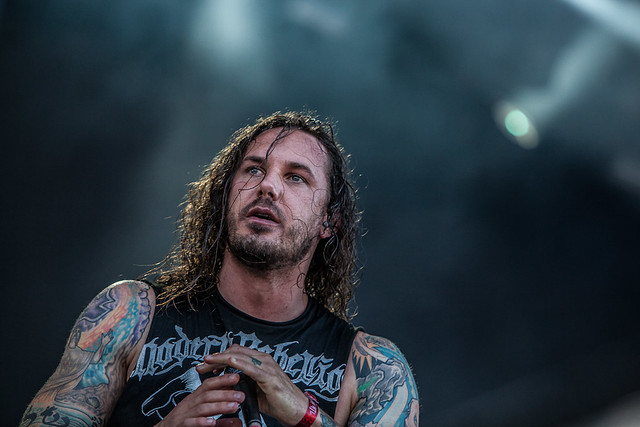
I am really liking the effect. While at 100% it is a bit harsh (but then, there is no better way to get the full appreciation of the processing it is doing than going max), I am really digging the contrast and variances it is throwing in the detail. The face is brighter, the hair really pops. I'm not a fan of how it turned the lettering on his shirt grey, but what can you do.
For fun, here is what maxed Clarity looks like in Lightroom 3. Not as intense as the new Lightroom 4, probably more on the realistic side, but I like how I can adjust the Lightroom 4 version to really pump out the details or tone it down for just a little bit. I rather have the option than no option at all.

Pretty straight forward. Next up, I'll be working on my favorite set of adjustments next, the highlights, shadows, whites, darks... or the things that add contrast into an image!
So when a friend sent me a link to the Lightroom 4 beta download, I decided to give it a try. It's always fun to see what the software companies are doing. The beta comes with a bunch of warnings about how it can be buggy, crash and so on, so it is always a risk installing something like this. But no worries, they don't allow you to update your Lightroom 3 image catalog, so your existing images and edits and safe.
There are a good number of changes to the software that I won't really try out as they don't interest me and I don't currently use them. Such as a new map that shows the location of your images and a Book module that seems to be linked to Blurb (actually, looks cool).
I'm really curious about the changes to the image processing. In my image processing, I'm usually tweaking exposure, contrast, clarity, fill / recovery light, highlights/shadows, white balance, saturation and then noise and sharpening if needed.
Note that my testing is usually pretty simplistic. I'll stick with one adjustment slider, crank it to the max and then the min. I'll compare with the same thing in Lightroom 3. I'll throw in some various sliders, try and do the same thing I normally do in Lightroom 3 and compare the end results.
So my first stop is the Clarity slider. I love Clarity in Lightroom 3 for urban shots. I find it's great around 50-70% where there are lines and detail in the image. I use it sparingly for people shots, maybe 5-10% as I don't like the effect too much. It tends to bring out wrinkles in the face and give the subject a very harsh look, without adding much interest to the image.
For this test, I took an image of Tim Lambesis, lead singer of As I Lay Dying from the Heavy MTL festival. A rare moment where he isn't jumping around. This first image is straight out of the camera, no edits other than whatever default Lightroom 4 has in there (which is typically just sharpening for export).
Slightly under exposed, but a decent image to try out the Clarity slider. The light is a bit flat so the clarity shouldn't hurt the facial details too much, but I really like the murky background. This would be an image I pump a little more Clarity into.
So in Lightroom 4, all I did was max the Clarity to 100% and this is what I get. Take note of the changes in the hair and also in the tattoos.
I am really liking the effect. While at 100% it is a bit harsh (but then, there is no better way to get the full appreciation of the processing it is doing than going max), I am really digging the contrast and variances it is throwing in the detail. The face is brighter, the hair really pops. I'm not a fan of how it turned the lettering on his shirt grey, but what can you do.
For fun, here is what maxed Clarity looks like in Lightroom 3. Not as intense as the new Lightroom 4, probably more on the realistic side, but I like how I can adjust the Lightroom 4 version to really pump out the details or tone it down for just a little bit. I rather have the option than no option at all.
Pretty straight forward. Next up, I'll be working on my favorite set of adjustments next, the highlights, shadows, whites, darks... or the things that add contrast into an image!
Sunday, December 11, 2011
Look back on a Mercedes promo shoot
My good friend Didier was asked to take on a photoshoot for a promo for a Mercedes dealership event. He gave me a call to see if I wanted to help out, two heads are better than one (although some could argue that our two heads only equal one!). We exchanged a few emails, met up for supper, drew up some sketches and had a great collaboration going.
After getting some volunteer models, hair, makeup and all that wonderful photoshoot stuff, we were psyched for the day. Any day you get to have access to Mercedes cars for a day, specially 2 SLS AMGs, you get psyched.
"What?? We need to move the car AGAIN! Sure!! No prob!"
I actually would just randomly start up the car and rev the engine for fun. Yeah, I'm such a kid.
Ok, back to the shoot. We weren't too sure what to expect. We knew it was their basement and we had cars. Didier had seen the place before, but how were we going to make this work with 8 cards (2 SLS and 6 C300) is usually something you only really know when you get there. So you plan to be ready for anything and pack everything. This included multiple speedlights, softboxes, umbrellas, Profoto strobes, reflectors, way too many lenses, diffusers, an actual red carpet, dresses, fur coats...and the list goes on.
Having had just a few hours of sleep (due to a full day shoot and night gig the day before), I got to the dealership around 9am. The models were scheduled in for 11am for makeup and hair. The SilverStar Mercedes dealership were just awesome. Full access to their cars and facilities made our day much easier.
This is pretty much what it looked like when I walked in. Didier had just arrived and was there setting up and Emily was coming in to lend a hand.

A little bit tight. Low ceiling, reflective walls. So the first order of business, after getting some detail shots of the grills, was to clear out all but the 2 SLS, which were our showcase cars.
Now in the process of planning, we had some ideas already down, but we like to try things out as we set up as ideas keep coming. Here is an attempt at an setup with a strong back light that we didn't end up using. We had a few ideas of how to make it work, but decided that it didn't flow with our various setups and left it out. There is always next time!

Anyone who has been on a photoshoot with me, or has actually worked with me at any point and time, knows that goofing off is must and I'm always ready to lead the way. Decided to take some couple shots with my new buddies

And again, being escorted out of the car. Actually, I like to show people what I want them to do. I'm a very hands off photographer, so to get your idea across, nothing better than actually showing people what you mean. It's like a rough live sketch of an idea. A very very rough sketch. That ain't too pretty.

Cars backed out, SLS placed, lights started to click and things were pretty much taking shape. At this point, it's probably noon or so the models are getting ready, we went through the light setups for the different shots we wanted, transitions and so on. As much as I like to have fun while I work, you need to keep things moving at a good pace to ensure no one gets tired or cranky (other than me of course).
I thought this would be a PERFECT time to post up pictures of the SLS on my Facebook while standing in for a light setup. Nothing better than a bit of gloating!

Quick perspective shot, testing light placement from setup 1 to setup 2. Notice how thrilled Emily and I look? At least she faked a half smile. All I'm missing is to raise my leg and do a Captain Morgan pose. Yes, that is why I work behind the camera...

In playing in the cars ... I mean, moving them to their purposeful locations! ... we loved the look of the lights of the cars on. So we grabbed a giant reflector and placed it in front to bounce light back into the model's face.

And this is how it looked when we actually had models! (this is not a finished images, just a few quick edits in lightroom before throwing it up on the website)

This is my wonderful "oh crap, I just walked into your test shot! Sorry!!" moment. Yeah, those happen. I love my look of determination in heading to the other side of the room. I must of seen some coffee or something.

Our models just had to take a break and be pretend photographers. When you work with such relaxed people, moments like this are what it's about. Everyone just gelling together and having fun.

You have to love what you do. People often see the end results of a photoshoot, the perfectly touched up photos, the stunning models, the great locations. But behind all that glitz and glamour and just people trying to make great images. And in our case, awesome people taking their own weekend time to make some awesome images.
And seriously, why would anyone want another job?

After getting some volunteer models, hair, makeup and all that wonderful photoshoot stuff, we were psyched for the day. Any day you get to have access to Mercedes cars for a day, specially 2 SLS AMGs, you get psyched.
"What?? We need to move the car AGAIN! Sure!! No prob!"
I actually would just randomly start up the car and rev the engine for fun. Yeah, I'm such a kid.
Ok, back to the shoot. We weren't too sure what to expect. We knew it was their basement and we had cars. Didier had seen the place before, but how were we going to make this work with 8 cards (2 SLS and 6 C300) is usually something you only really know when you get there. So you plan to be ready for anything and pack everything. This included multiple speedlights, softboxes, umbrellas, Profoto strobes, reflectors, way too many lenses, diffusers, an actual red carpet, dresses, fur coats...and the list goes on.
Having had just a few hours of sleep (due to a full day shoot and night gig the day before), I got to the dealership around 9am. The models were scheduled in for 11am for makeup and hair. The SilverStar Mercedes dealership were just awesome. Full access to their cars and facilities made our day much easier.
This is pretty much what it looked like when I walked in. Didier had just arrived and was there setting up and Emily was coming in to lend a hand.
A little bit tight. Low ceiling, reflective walls. So the first order of business, after getting some detail shots of the grills, was to clear out all but the 2 SLS, which were our showcase cars.
Now in the process of planning, we had some ideas already down, but we like to try things out as we set up as ideas keep coming. Here is an attempt at an setup with a strong back light that we didn't end up using. We had a few ideas of how to make it work, but decided that it didn't flow with our various setups and left it out. There is always next time!
Anyone who has been on a photoshoot with me, or has actually worked with me at any point and time, knows that goofing off is must and I'm always ready to lead the way. Decided to take some couple shots with my new buddies
And again, being escorted out of the car. Actually, I like to show people what I want them to do. I'm a very hands off photographer, so to get your idea across, nothing better than actually showing people what you mean. It's like a rough live sketch of an idea. A very very rough sketch. That ain't too pretty.
Cars backed out, SLS placed, lights started to click and things were pretty much taking shape. At this point, it's probably noon or so the models are getting ready, we went through the light setups for the different shots we wanted, transitions and so on. As much as I like to have fun while I work, you need to keep things moving at a good pace to ensure no one gets tired or cranky (other than me of course).
I thought this would be a PERFECT time to post up pictures of the SLS on my Facebook while standing in for a light setup. Nothing better than a bit of gloating!
Quick perspective shot, testing light placement from setup 1 to setup 2. Notice how thrilled Emily and I look? At least she faked a half smile. All I'm missing is to raise my leg and do a Captain Morgan pose. Yes, that is why I work behind the camera...
In playing in the cars ... I mean, moving them to their purposeful locations! ... we loved the look of the lights of the cars on. So we grabbed a giant reflector and placed it in front to bounce light back into the model's face.
And this is how it looked when we actually had models! (this is not a finished images, just a few quick edits in lightroom before throwing it up on the website)
This is my wonderful "oh crap, I just walked into your test shot! Sorry!!" moment. Yeah, those happen. I love my look of determination in heading to the other side of the room. I must of seen some coffee or something.
Our models just had to take a break and be pretend photographers. When you work with such relaxed people, moments like this are what it's about. Everyone just gelling together and having fun.
You have to love what you do. People often see the end results of a photoshoot, the perfectly touched up photos, the stunning models, the great locations. But behind all that glitz and glamour and just people trying to make great images. And in our case, awesome people taking their own weekend time to make some awesome images.
And seriously, why would anyone want another job?
Tuesday, November 22, 2011
M for Montreal ... M for Music ... M for Memorable
Montreal is renowned for its festivals. The biggest being the Jazz Festival and the Just for Laughs comedy festival. A new festival is picking up steam. M For Montreal had its 6th edition this year. For those who don’t know, M is focused on local talent. But not just putting them on a stage to play, they have a goal of promoting local acts internationally to help opens doors. They invite music industry delegates from around the world to come to Montreal for the 4 day festival and watch the bands put on a showcase of what they do. In the past, this has led to some breakthroughs for great local bands, US tours, European tours, Asian tours, and help in promoting new albums... You can check out M’s website http://www.mpourmontreal.com/
How did I get involved in M this year? It was semi last minute. I had planned on watching Hollerado, one of the bands that are getting regular play in my headphones, who was headlining a showcase at Sala Rosa. One of the shooters who was scheduled to do the bigger shows was no longer available, so I decided to step in and shoot the shows he was scheduled to do.... which unfortunately meant that I did not get a chance to see Hollerado live.
My first gig was the M For Midnight show at Club Soda. Plaster, making their return to stage, Misteur Valaire, who are on a really quick rise, and Montreal’s darlings Bran Van 3000 were on stage for this late show. And was it ever packed. And when I mean packed, I mean PACKED. The show was actually oversold, which meant that we media had to wait outside until they could determine how much room was left in the venue. Yes, there is a disclaimer on the back of the media pass that says “if there is room”.
We weren’t the only ones waiting outside. Some fans had bought a 4 day pass that grants them access to all shows, and they were waiting outside. With the show starting at midnight, and myself and a journalist getting there around 11pm, we finally got inside around 12:30am and unfortunately only caught the tail end of Plaster’s set.
Disappointed, yes, but we were rewarded with an awesome show from Misteur Valaire and Bran Van 3000. Shooting wise, I decided to stay on the 2nd floor balcony which was initially reserved for the delegates (but they were nice enough to let me squat there). I was able to move up and down the balcony area giving me some fun angles, instead of being down on the floor with no photo pit in the middle of the chaos.
Being perched up top allows you to get some pretty fun shots of bands, like the ones below. Not traditional angles, but they can work. The problem with being more stationary is that you need to be aware and ready to shoot when the artists turn around or give a look, as this is how you will get your variety.

You can see the Mister Valaire image gallery here

You can see the Bran Van image gallery here
After a few hours of sleep and image processing, it was back out for the closing show on Saturday. I was psyched for this show as the promoter managed to put together an awesome line-up. Some artists such as Ariane Moffatt and Marie-Pierre Arthur, who are currently in studio, were convinced to come out and play on stage. Other artists such as Karkwa, Galaxie, Random Recipe and The Barr Brothers all have their stars rising and this was a great way for them to get more exposure. It was great to see Random Recipe so excited to be on the stage of the Metropolis for the first time (and definitely not the last!)
Again, no photo pit for this show, so I decided to arrive early (that being 7pm for a show that starts at 8pm) and wiggle into the front row and stay there for the evening. I’m stuck in a static position again, but I tried to use the lights to create variety in my shots. Doing this can sometimes backfire, as it did for Galaxie, as they set the backup singers right in front of me, severely limiting the shooting angles. But life gives you lemons, you make lemon vodka shooters!
The lights were all over the place. They had these tiny yellow spots down below that cast some really odd and eerie light on the artists from down below, and were often the only lights on. When the spots weren’t on, the stage was blasted from either side with these giant white lights. While I always love white light, the intensity of these lights meant quick finger dialing of new settings but gave many of the images an “I used onboard flash” look where the artist is bright and white and the rest of the scene is total black.
Using the light for a more dramatic effect during Marie-Pierre Arthur

See the full MP Arthur gallery here

See the full The Barr Brothers gallery here

See the full Ariane Moffatt gallery here

See the full Random Recipe gallery here
Small yellow spot lights gave an eerie “ghost story around the camp fire” feel to many images.

See the full Galaxie gallery here
You sometimes get interesting angles on drummers and percussionists

See the full Karkwa gallery here
It was a long and intense 2 days of shooting. Technically, as the Club Soda show started at 12:30, it was all on the same day. ;)
Thanks for reading!
How did I get involved in M this year? It was semi last minute. I had planned on watching Hollerado, one of the bands that are getting regular play in my headphones, who was headlining a showcase at Sala Rosa. One of the shooters who was scheduled to do the bigger shows was no longer available, so I decided to step in and shoot the shows he was scheduled to do.... which unfortunately meant that I did not get a chance to see Hollerado live.
My first gig was the M For Midnight show at Club Soda. Plaster, making their return to stage, Misteur Valaire, who are on a really quick rise, and Montreal’s darlings Bran Van 3000 were on stage for this late show. And was it ever packed. And when I mean packed, I mean PACKED. The show was actually oversold, which meant that we media had to wait outside until they could determine how much room was left in the venue. Yes, there is a disclaimer on the back of the media pass that says “if there is room”.
We weren’t the only ones waiting outside. Some fans had bought a 4 day pass that grants them access to all shows, and they were waiting outside. With the show starting at midnight, and myself and a journalist getting there around 11pm, we finally got inside around 12:30am and unfortunately only caught the tail end of Plaster’s set.
Disappointed, yes, but we were rewarded with an awesome show from Misteur Valaire and Bran Van 3000. Shooting wise, I decided to stay on the 2nd floor balcony which was initially reserved for the delegates (but they were nice enough to let me squat there). I was able to move up and down the balcony area giving me some fun angles, instead of being down on the floor with no photo pit in the middle of the chaos.
Being perched up top allows you to get some pretty fun shots of bands, like the ones below. Not traditional angles, but they can work. The problem with being more stationary is that you need to be aware and ready to shoot when the artists turn around or give a look, as this is how you will get your variety.
You can see the Mister Valaire image gallery here
You can see the Bran Van image gallery here
After a few hours of sleep and image processing, it was back out for the closing show on Saturday. I was psyched for this show as the promoter managed to put together an awesome line-up. Some artists such as Ariane Moffatt and Marie-Pierre Arthur, who are currently in studio, were convinced to come out and play on stage. Other artists such as Karkwa, Galaxie, Random Recipe and The Barr Brothers all have their stars rising and this was a great way for them to get more exposure. It was great to see Random Recipe so excited to be on the stage of the Metropolis for the first time (and definitely not the last!)
Again, no photo pit for this show, so I decided to arrive early (that being 7pm for a show that starts at 8pm) and wiggle into the front row and stay there for the evening. I’m stuck in a static position again, but I tried to use the lights to create variety in my shots. Doing this can sometimes backfire, as it did for Galaxie, as they set the backup singers right in front of me, severely limiting the shooting angles. But life gives you lemons, you make lemon vodka shooters!
The lights were all over the place. They had these tiny yellow spots down below that cast some really odd and eerie light on the artists from down below, and were often the only lights on. When the spots weren’t on, the stage was blasted from either side with these giant white lights. While I always love white light, the intensity of these lights meant quick finger dialing of new settings but gave many of the images an “I used onboard flash” look where the artist is bright and white and the rest of the scene is total black.
Using the light for a more dramatic effect during Marie-Pierre Arthur
See the full MP Arthur gallery here
See the full The Barr Brothers gallery here
See the full Ariane Moffatt gallery here
See the full Random Recipe gallery here
Small yellow spot lights gave an eerie “ghost story around the camp fire” feel to many images.
See the full Galaxie gallery here
You sometimes get interesting angles on drummers and percussionists
See the full Karkwa gallery here
It was a long and intense 2 days of shooting. Technically, as the Club Soda show started at 12:30, it was all on the same day. ;)
Thanks for reading!
Wednesday, November 16, 2011
Shooting a giant bed sheet (?)
Had a first in terms of show shooting on Tuesday night. Which will lead to a not so glamorous set of photos, but I feel the story needs to be told (hehe)
I was assigned to shoot Steven Wilson, the singer of Porcupine Tree and also of Blackfield (whom I shot a few months ago), at the Corona theatre. The Corona is a beautiful old style theatre, however the lighting in there can be pretty dim.
When the manager tells you that you have 6 songs (instead of the regular 3), take this with a grain of salt. There is usually a reason behind it.
When the manager also gives you a free ticket for the show, on top of the 6 song limit, get ready for an interesting night.
I get in the theatre and notice this huge semi-transparent curtain in front of the stage. There were some video projections on it. So I figured the curtain will be up, the music will start, we’ll see bits of the band behind the curtain, then the music will ramp up and the curtain will come crashing down, the lights will blast, the band will go insane on stage, everyone will go crazy in the audience (ok, I’ve seen too many rock shows).
Not the case. The show started low key, with the band behind the curtain...and they stayed there. I went to one of the corners of the stage, right where there was a bit of space beside the curtain, stuck my lens through and started getting some shots. I guess I wasn’t discreet enough as within 20 seconds, the manager came by, tapped me on the shoulder and said I couldn’t do that....and then he hung around nearby
So I waited. The first song was done, curtain still up. They start putting some backlight on the curtain, making shooting pretty pointless as the backlight gets diffused in the curtain and camera sensors really don’t like this.
The image below was shot through the curtain. It still has an interesting psychedelic feel to it, which was perfect for the song being played.

Second song starts, I decide that I need to get some shots, so I head to the back and get some wider shots with the curtain and see if I can find angles that work or incorporate the curtain element into the shot. For all I know, this is the best I’ll get and I still do have an editor to answer to. While I always give my 110% at every show, there are always times where the situation is that even your 110% won't net you a magazine worthy shot.
In the curtain shots, I was looking for angles that minimized the light diffusion and tried to find interesting shadows or images.


Second song done. I see the manager standing by the backstage door so I go ask if the curtain will ever come down. He tells me it will after song 4, during song 5. So my 6 song limit is pretty much 1 ½ songs. Haha.
The curtain did come down at the start of song 5, gave me a few shots, but with the floor being busy and no photo pit, you are somewhat limited in what you can do. I did the rest of song 5 on the floor and headed up for song 6 to get some higher up shots. The lighting for the rest of the show was pretty harsh and contrasty, with some washes on the stage. For the fans, it must of been a really visually interesting show. As a photographer, the lights are part of the show. As a photojournalist, they tell the story of the event.
All in all, an interesting and challenging evening. While at first I was a bit ticked, trying to get the best you can with what you have was actually fun.
Curtain up, I was able to get some better quality shots of Steven and his band. The first below will help show the backlight that was predominant during the show. This is similar lighting to the first image I posted in the blog entry, but without the curtain.


I was assigned to shoot Steven Wilson, the singer of Porcupine Tree and also of Blackfield (whom I shot a few months ago), at the Corona theatre. The Corona is a beautiful old style theatre, however the lighting in there can be pretty dim.
When the manager tells you that you have 6 songs (instead of the regular 3), take this with a grain of salt. There is usually a reason behind it.
When the manager also gives you a free ticket for the show, on top of the 6 song limit, get ready for an interesting night.
I get in the theatre and notice this huge semi-transparent curtain in front of the stage. There were some video projections on it. So I figured the curtain will be up, the music will start, we’ll see bits of the band behind the curtain, then the music will ramp up and the curtain will come crashing down, the lights will blast, the band will go insane on stage, everyone will go crazy in the audience (ok, I’ve seen too many rock shows).
Not the case. The show started low key, with the band behind the curtain...and they stayed there. I went to one of the corners of the stage, right where there was a bit of space beside the curtain, stuck my lens through and started getting some shots. I guess I wasn’t discreet enough as within 20 seconds, the manager came by, tapped me on the shoulder and said I couldn’t do that....and then he hung around nearby
So I waited. The first song was done, curtain still up. They start putting some backlight on the curtain, making shooting pretty pointless as the backlight gets diffused in the curtain and camera sensors really don’t like this.
The image below was shot through the curtain. It still has an interesting psychedelic feel to it, which was perfect for the song being played.
Second song starts, I decide that I need to get some shots, so I head to the back and get some wider shots with the curtain and see if I can find angles that work or incorporate the curtain element into the shot. For all I know, this is the best I’ll get and I still do have an editor to answer to. While I always give my 110% at every show, there are always times where the situation is that even your 110% won't net you a magazine worthy shot.
In the curtain shots, I was looking for angles that minimized the light diffusion and tried to find interesting shadows or images.
Second song done. I see the manager standing by the backstage door so I go ask if the curtain will ever come down. He tells me it will after song 4, during song 5. So my 6 song limit is pretty much 1 ½ songs. Haha.
The curtain did come down at the start of song 5, gave me a few shots, but with the floor being busy and no photo pit, you are somewhat limited in what you can do. I did the rest of song 5 on the floor and headed up for song 6 to get some higher up shots. The lighting for the rest of the show was pretty harsh and contrasty, with some washes on the stage. For the fans, it must of been a really visually interesting show. As a photographer, the lights are part of the show. As a photojournalist, they tell the story of the event.
All in all, an interesting and challenging evening. While at first I was a bit ticked, trying to get the best you can with what you have was actually fun.
Curtain up, I was able to get some better quality shots of Steven and his band. The first below will help show the backlight that was predominant during the show. This is similar lighting to the first image I posted in the blog entry, but without the curtain.
Monday, October 31, 2011
Ready....set....shoot!
My coordinator at Production Iris sent out an email asking for a last minute replacement to shoot a university football game. While I am a fan of the sport, and I have shot other sports in the distant past, I never actually had the opportunity to shoot a football game, so I jumped on the chance. After a tiny bit of convincing (as my sport portfolio isn't the grandest), he gave me the go.
So Saturday morning, I got up and prepped my equipment....all my equipment. I have shot soccer, which is similar in terms of field coverage and speed of game, and I knew that you had to be prepared for anything. So bringing 2 bodies was a must, as I would never have time to switch lenses between when the QB throws the pass and the receiver right in front of me catches it. Here is a breakdown of my gear for the day
Canon 7D + 70-200 f/2.8 + 1.4x teleconverter
This is my best the setup for max range. The 7D, as with all Canon crop sensor cameras (Rebels, 40D, 50D, 60D, 7D) have smaller sensors and thus give you an effective focal range 1.6x the actual focal range. This means that a 200mm lens is effectively a 320mm range. Attached to the 70-200, I put on a 1.4x teleconverter which made my 70-200 on a 7D into a 450mm lens. Now I'm getting into the right focal range for getting close in on a football field. The drawback of the 1.4x teleconverter is that it cuts one stop of light. So my f/2.8 lens is a maximum of f/4. Not a huge deal for a daytime sports event.
I kept this setup as my bread and butter and had it on a monopod for the whole game. This is what gets you the close up money shots. I would love to have the 400mm f/2.8 lens that the pros use, but I don't have $14,000 just lying around :)

Canon 5D2 + 24-70
This is my up close lens. A more seasoned sport shooter at Iris gave me the suggestion to keep this setup ready at all times. When the action gets really close, just grab the camera and shoot blind. I kept the Focus points to auto select and made sure I had a fast shutter speed. I kept the focal range around 40-50mm. Those few times the players come crashing down on you, I had my camera ready to go.

Other
I also kept in my bag a Canon 10-22mm for ultra wide shots, but never once took it out.
Gloves were a must as it was pretty darn cold outside. While I am moving up and down the sidelines, I'm stationary most of the time and you get cold, fast. I have these thing gloves with leather on the fingers, making the camera operation easy.
How I shot football
Knowing the game is key. You are minded like a defensive player and have to anticipate what type of play will happen. You also have to think about the shot that you want and from which angle you want it from, as this will impact how far down the field you are. If you want a side shot of the QB throwing, don't stand 30 yards away from the line of scrimmage.

Canadian football has 3 downs, as compared to American football which has 4. This means there are a lot more passes in Canadian football than in American. Other slight rule differences (which don't impact photography) are the field is 10 yards longer, the end zone is longer, defensive players line up a yard away from the line of scrimmage. So again, knowing the game is a great asset to having a successful shoot.
After a few plays, I figured out that when in doubt (hey, that rhymes!) stand about 10 yards down from the line of scrimmage on the defensive side. This will give a decent shot of the QB as he drops back to throw or allow you to lock on the RB for a hand off. Most throws are in the 10 yard range, so if the QB throws the ball in your direction, chances are the receiver is right nearby. Once they get within 10 yards of the goal line, heading to the back of the end zone is a good idea as this will give interesting touchdown shots. Luck of the draw and I was not in a good position for any of the touchdown shots, but I did get a few misses in the end zone


Shooting a university game is pretty action packed. I was only allowed on the side line opposite the player benches. I'm sharing this 3-4 yard wide area with the line judges, the cheerleaders, a few security guards and the other photographers. So things get pretty tight. In trying to make my way around the cheerleaders doing their thing, I got whacked in the head by a pom-pom. The referees own the sidelines, so at all times, you must not be in their way. Let them go by, then work around.
Be mindful of the play and learn to shoot with one eye open. When you are this close to the action, it goes by really fast. In the picture below, I had a great angle on the QB throwing the ball. What I failed to noticed was that the receiver was right near me. Really, I swear I was paying attention and not looking at the cheerleaders. After snapping a few shots, I had to jump out of the way as the players come crashing through very fast. And they are big, and heavy, and there are often more than just one.

All in all, I had a great time shooting. It gave me some good insight on shooting the game and having quick reactions. Always good to stretch your skills once and a while as you can pick things up that you can apply in your day to day shooting.
Thanks for reading! Here are a few more from the game. Full series of 62 are up on the website.


So Saturday morning, I got up and prepped my equipment....all my equipment. I have shot soccer, which is similar in terms of field coverage and speed of game, and I knew that you had to be prepared for anything. So bringing 2 bodies was a must, as I would never have time to switch lenses between when the QB throws the pass and the receiver right in front of me catches it. Here is a breakdown of my gear for the day
Canon 7D + 70-200 f/2.8 + 1.4x teleconverter
This is my best the setup for max range. The 7D, as with all Canon crop sensor cameras (Rebels, 40D, 50D, 60D, 7D) have smaller sensors and thus give you an effective focal range 1.6x the actual focal range. This means that a 200mm lens is effectively a 320mm range. Attached to the 70-200, I put on a 1.4x teleconverter which made my 70-200 on a 7D into a 450mm lens. Now I'm getting into the right focal range for getting close in on a football field. The drawback of the 1.4x teleconverter is that it cuts one stop of light. So my f/2.8 lens is a maximum of f/4. Not a huge deal for a daytime sports event.
I kept this setup as my bread and butter and had it on a monopod for the whole game. This is what gets you the close up money shots. I would love to have the 400mm f/2.8 lens that the pros use, but I don't have $14,000 just lying around :)
Canon 5D2 + 24-70
This is my up close lens. A more seasoned sport shooter at Iris gave me the suggestion to keep this setup ready at all times. When the action gets really close, just grab the camera and shoot blind. I kept the Focus points to auto select and made sure I had a fast shutter speed. I kept the focal range around 40-50mm. Those few times the players come crashing down on you, I had my camera ready to go.
Other
I also kept in my bag a Canon 10-22mm for ultra wide shots, but never once took it out.
Gloves were a must as it was pretty darn cold outside. While I am moving up and down the sidelines, I'm stationary most of the time and you get cold, fast. I have these thing gloves with leather on the fingers, making the camera operation easy.
How I shot football
Knowing the game is key. You are minded like a defensive player and have to anticipate what type of play will happen. You also have to think about the shot that you want and from which angle you want it from, as this will impact how far down the field you are. If you want a side shot of the QB throwing, don't stand 30 yards away from the line of scrimmage.
Canadian football has 3 downs, as compared to American football which has 4. This means there are a lot more passes in Canadian football than in American. Other slight rule differences (which don't impact photography) are the field is 10 yards longer, the end zone is longer, defensive players line up a yard away from the line of scrimmage. So again, knowing the game is a great asset to having a successful shoot.
After a few plays, I figured out that when in doubt (hey, that rhymes!) stand about 10 yards down from the line of scrimmage on the defensive side. This will give a decent shot of the QB as he drops back to throw or allow you to lock on the RB for a hand off. Most throws are in the 10 yard range, so if the QB throws the ball in your direction, chances are the receiver is right nearby. Once they get within 10 yards of the goal line, heading to the back of the end zone is a good idea as this will give interesting touchdown shots. Luck of the draw and I was not in a good position for any of the touchdown shots, but I did get a few misses in the end zone
Shooting a university game is pretty action packed. I was only allowed on the side line opposite the player benches. I'm sharing this 3-4 yard wide area with the line judges, the cheerleaders, a few security guards and the other photographers. So things get pretty tight. In trying to make my way around the cheerleaders doing their thing, I got whacked in the head by a pom-pom. The referees own the sidelines, so at all times, you must not be in their way. Let them go by, then work around.
Be mindful of the play and learn to shoot with one eye open. When you are this close to the action, it goes by really fast. In the picture below, I had a great angle on the QB throwing the ball. What I failed to noticed was that the receiver was right near me. Really, I swear I was paying attention and not looking at the cheerleaders. After snapping a few shots, I had to jump out of the way as the players come crashing through very fast. And they are big, and heavy, and there are often more than just one.
All in all, I had a great time shooting. It gave me some good insight on shooting the game and having quick reactions. Always good to stretch your skills once and a while as you can pick things up that you can apply in your day to day shooting.
Thanks for reading! Here are a few more from the game. Full series of 62 are up on the website.
Subscribe to:
Posts (Atom)